Procedure for Windows system
Notes on Visual Studio
The more standard approach to develop C++ code on Windows is the use of Microsoft Visual Studio.- - This software integrate both a C++ compiler and an IDE.
- - Visual Studio is the privilegiated development solution from Microsoft that natively integrates within Windows system. It allows to generate .exe file that can directly access the full capacity of your system (in particular your graphics card for OpenGL programs).
- Do not confuse "Visual Studio" with "Visual Studio Code". Visual Studio Code is a lightweight text editor, and does not include a C++ compiler -- therefore its use would require to install and setup up a C++ compiler. Visual Studio, on the other hand, is a complete IDE and include a compiler already set up.
- In case of issues with Visual Studio, it is always possible to install a Virtual Machine that can run another OS in a sandbox.
- - VirtualBox and VMware Workstation Player are two free options that can be used to install and run Linux such as Ubuntu from Windows OS.
- - Note that installing a typical Linux on a virtual machine will take about 10Go of disk space, and the emulated OS will not be able to use your graphics card. As a result, you will be able to run your OpenGL code, but its speed will be slower than with a native Windows executable.
System setup for Visual Studio
- > First download and install CMake
-
- You can follow the default settings proposed during the installation step.
- > Download and install (if it is not installed yet) Microsoft Visual Studio Community Edition
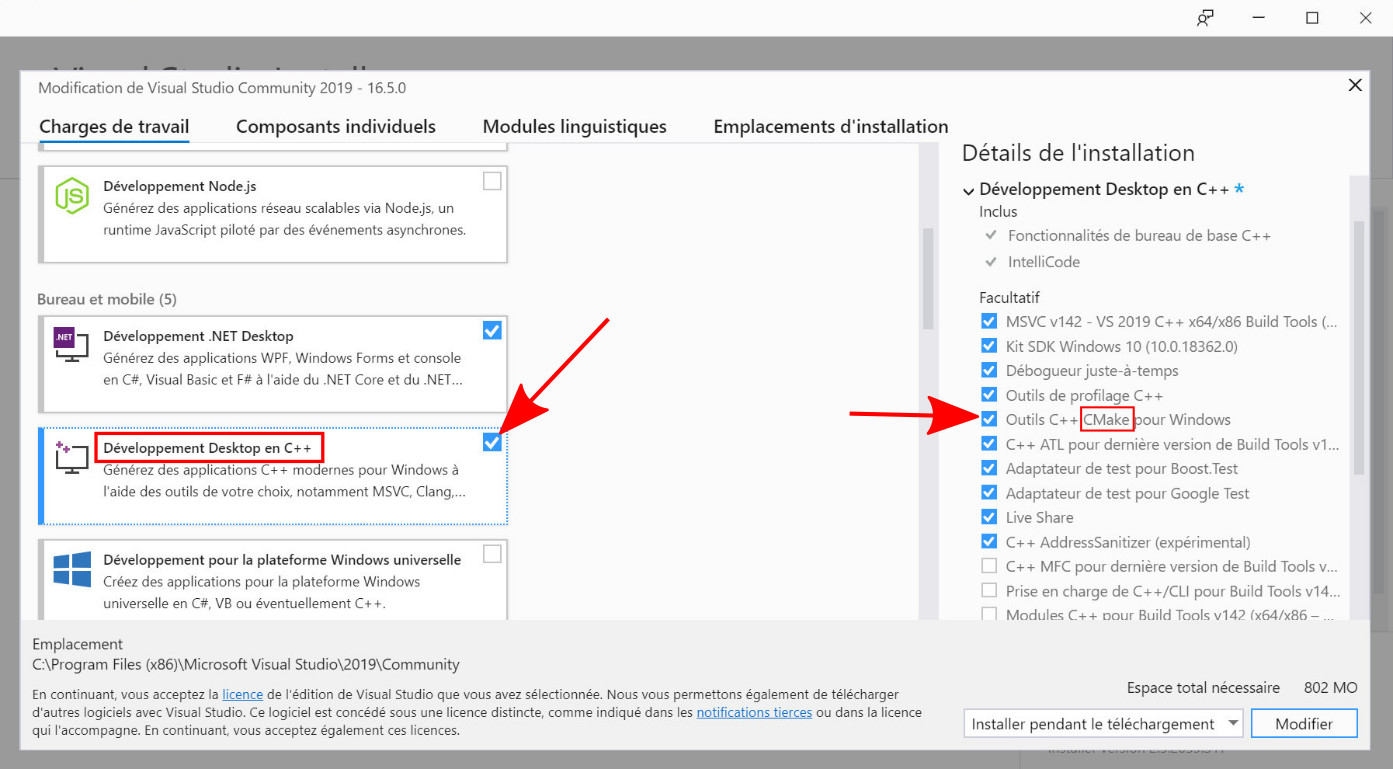
- Make sure you select these options during the installation (see the image below):
-
- - Desktop development with C++ - otherwise you will not get the C++ compiler
- - C++ CMake tools for Windows.
- Link to the official documentation for more information.
- Notes:
- - Visual Studio is a heavy program, its installation can take some time (and require reboot your system).
- - Visual Studio Community Edition is free for students and open source projects. You may however need to create a Microsoft account to register your product and extend your licence (even if the licence is free).
Compile and execute the code
Generating a Visual Studio project
The first step is to generate a Visual Studio project from the CMake tool.- 1. Start CMake (cmake-gui)
-
- - Fill "Where is the source code" with the path to the directory sample_code of the project (or more generally the directory that contains the CMakeLists.txt associated to the project)
- - Fill "Where to build the binaries" with the path `sample_code/build` (in other cases, you will adjust the name sample_code to your current project)
- 2. Click Configure
-
- Accept the creation of the build/ directory if asked.
- Check that the generator is set to Visual Studio 2019 (or your version of Visual Studio).
- 3. Once the configuration is done, click on Generate
-
- - Check that the generation is done
- - A `build/` directory should be created and contain a file `projectName.sln` (projectName has to be adapted to your own project - the sample code generate sample_code.sln).
- Notes:
- - These steps have to be done only once to start a given project.
- - These steps should also be done if your add/remove files in the project in order to run CMake again.
Setting up Visual Studio configuration
- > Start Visual Studio and open the project file `projectName.sln`, or double click on it.
- > Make sure that the project loads and that you can naviguate through the hierarchy of files via the "Solution Explorer".
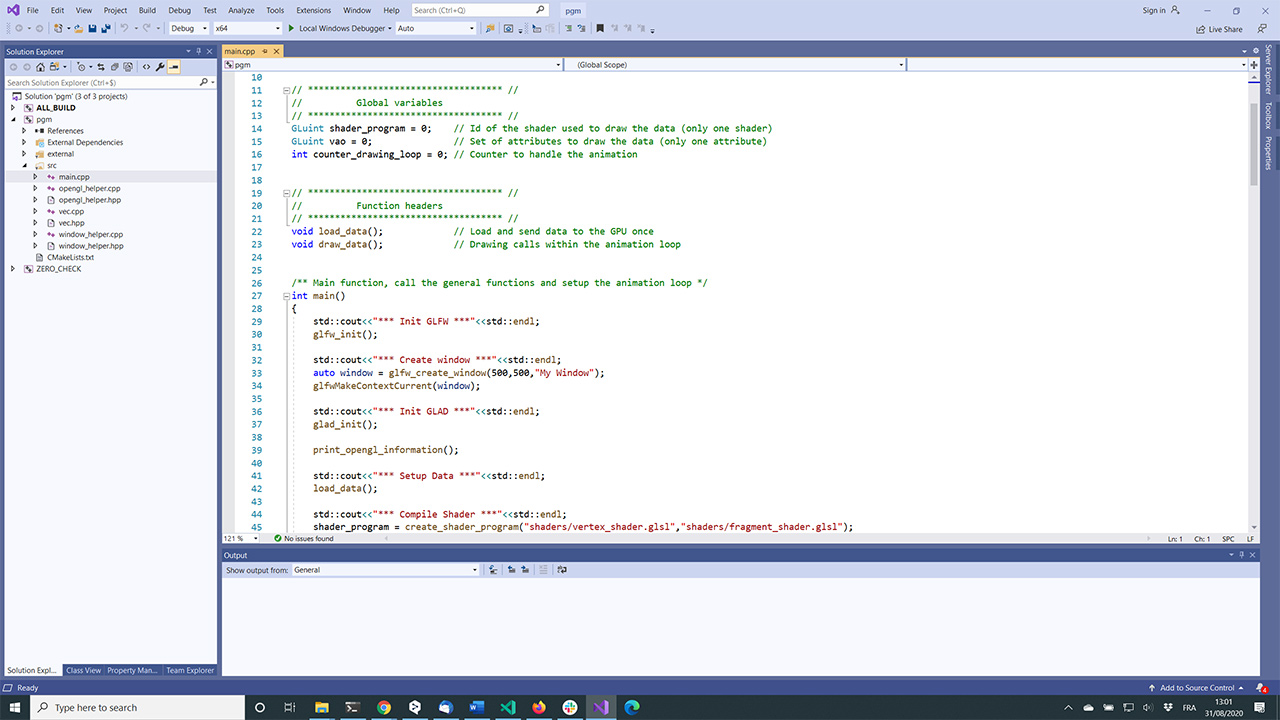
Example of project loaded in Visual Studio. Left: the "Solution Explorer" allowing to naviguate through the project files. Middle: the code of the selected file.
1. In the solution explorer
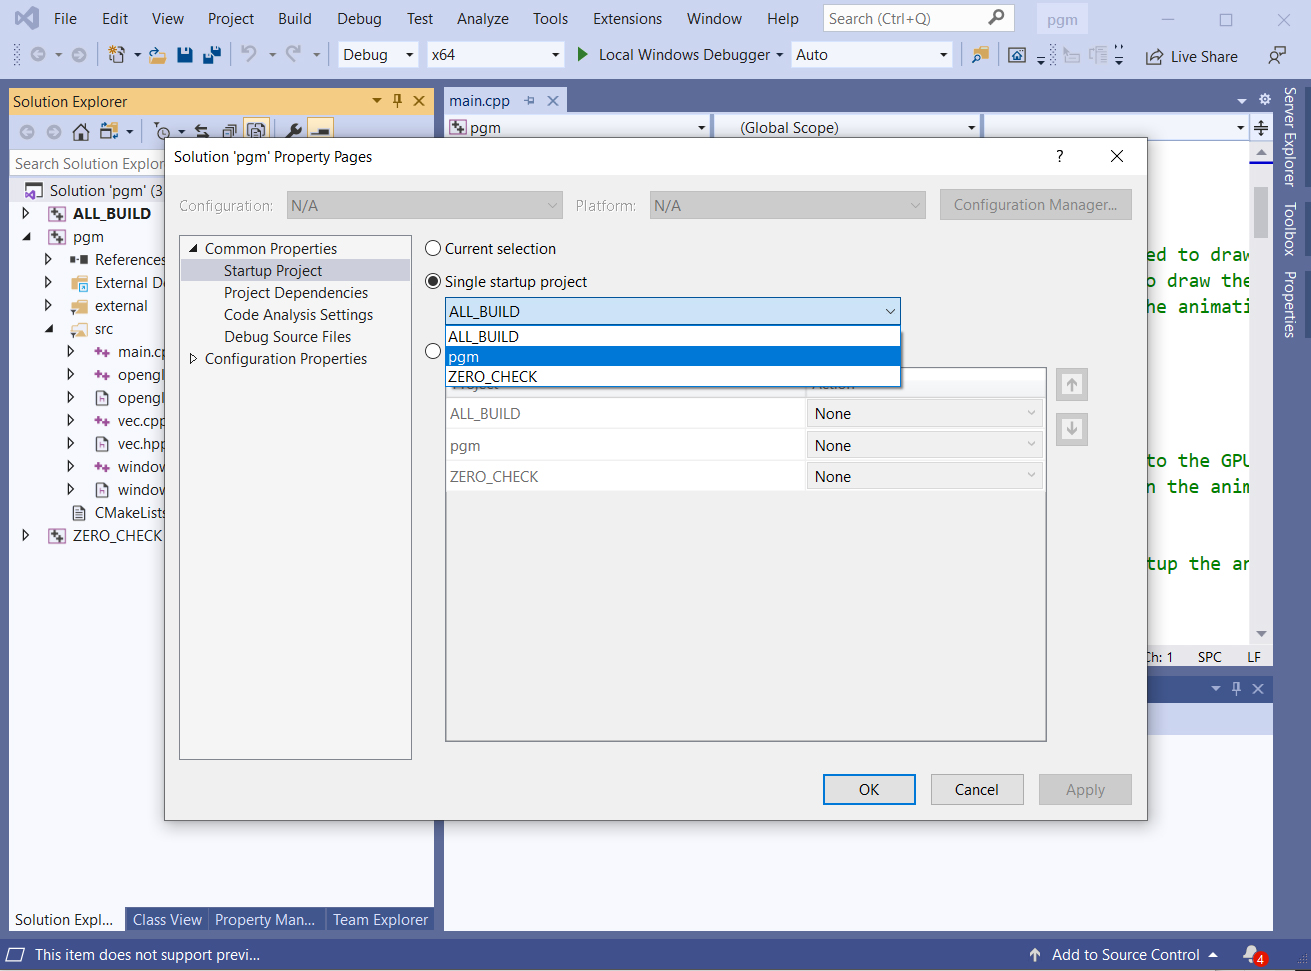
- > Right click on Solution 'projectName' (Solution 'sample_code' in the sample code) and select Properties
- > Change the value of `Single startup project` to `projectName` (this sets Visual Studio to compile the current project instead of a generic "All_BUILD" empty project).
2. In the top toolbar
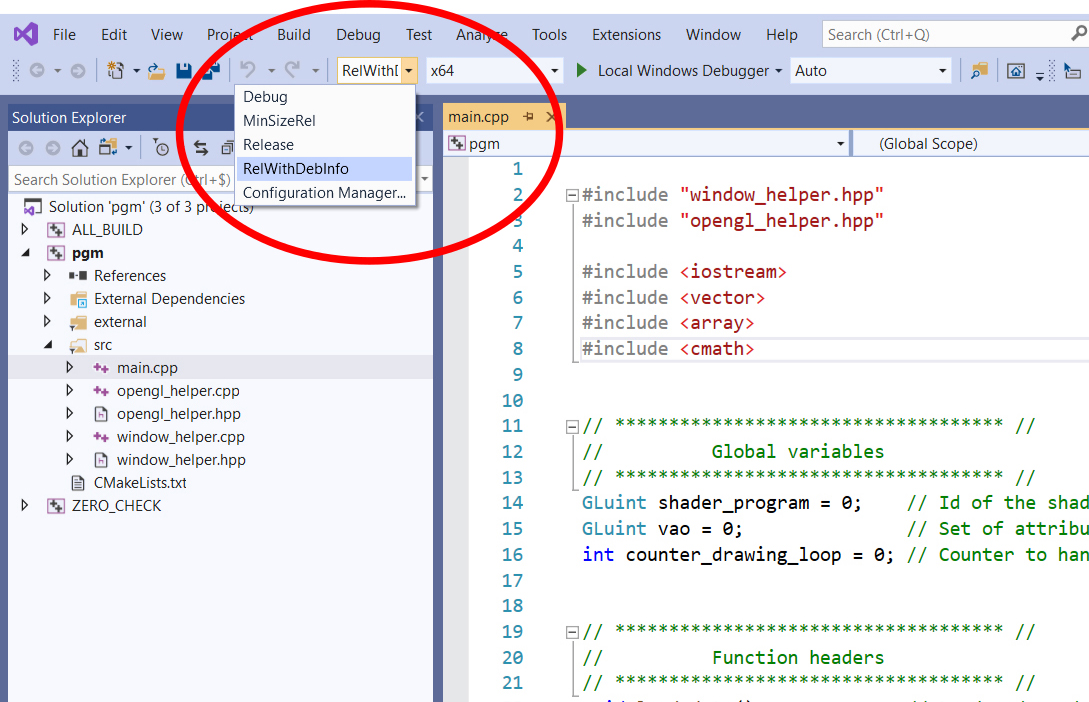
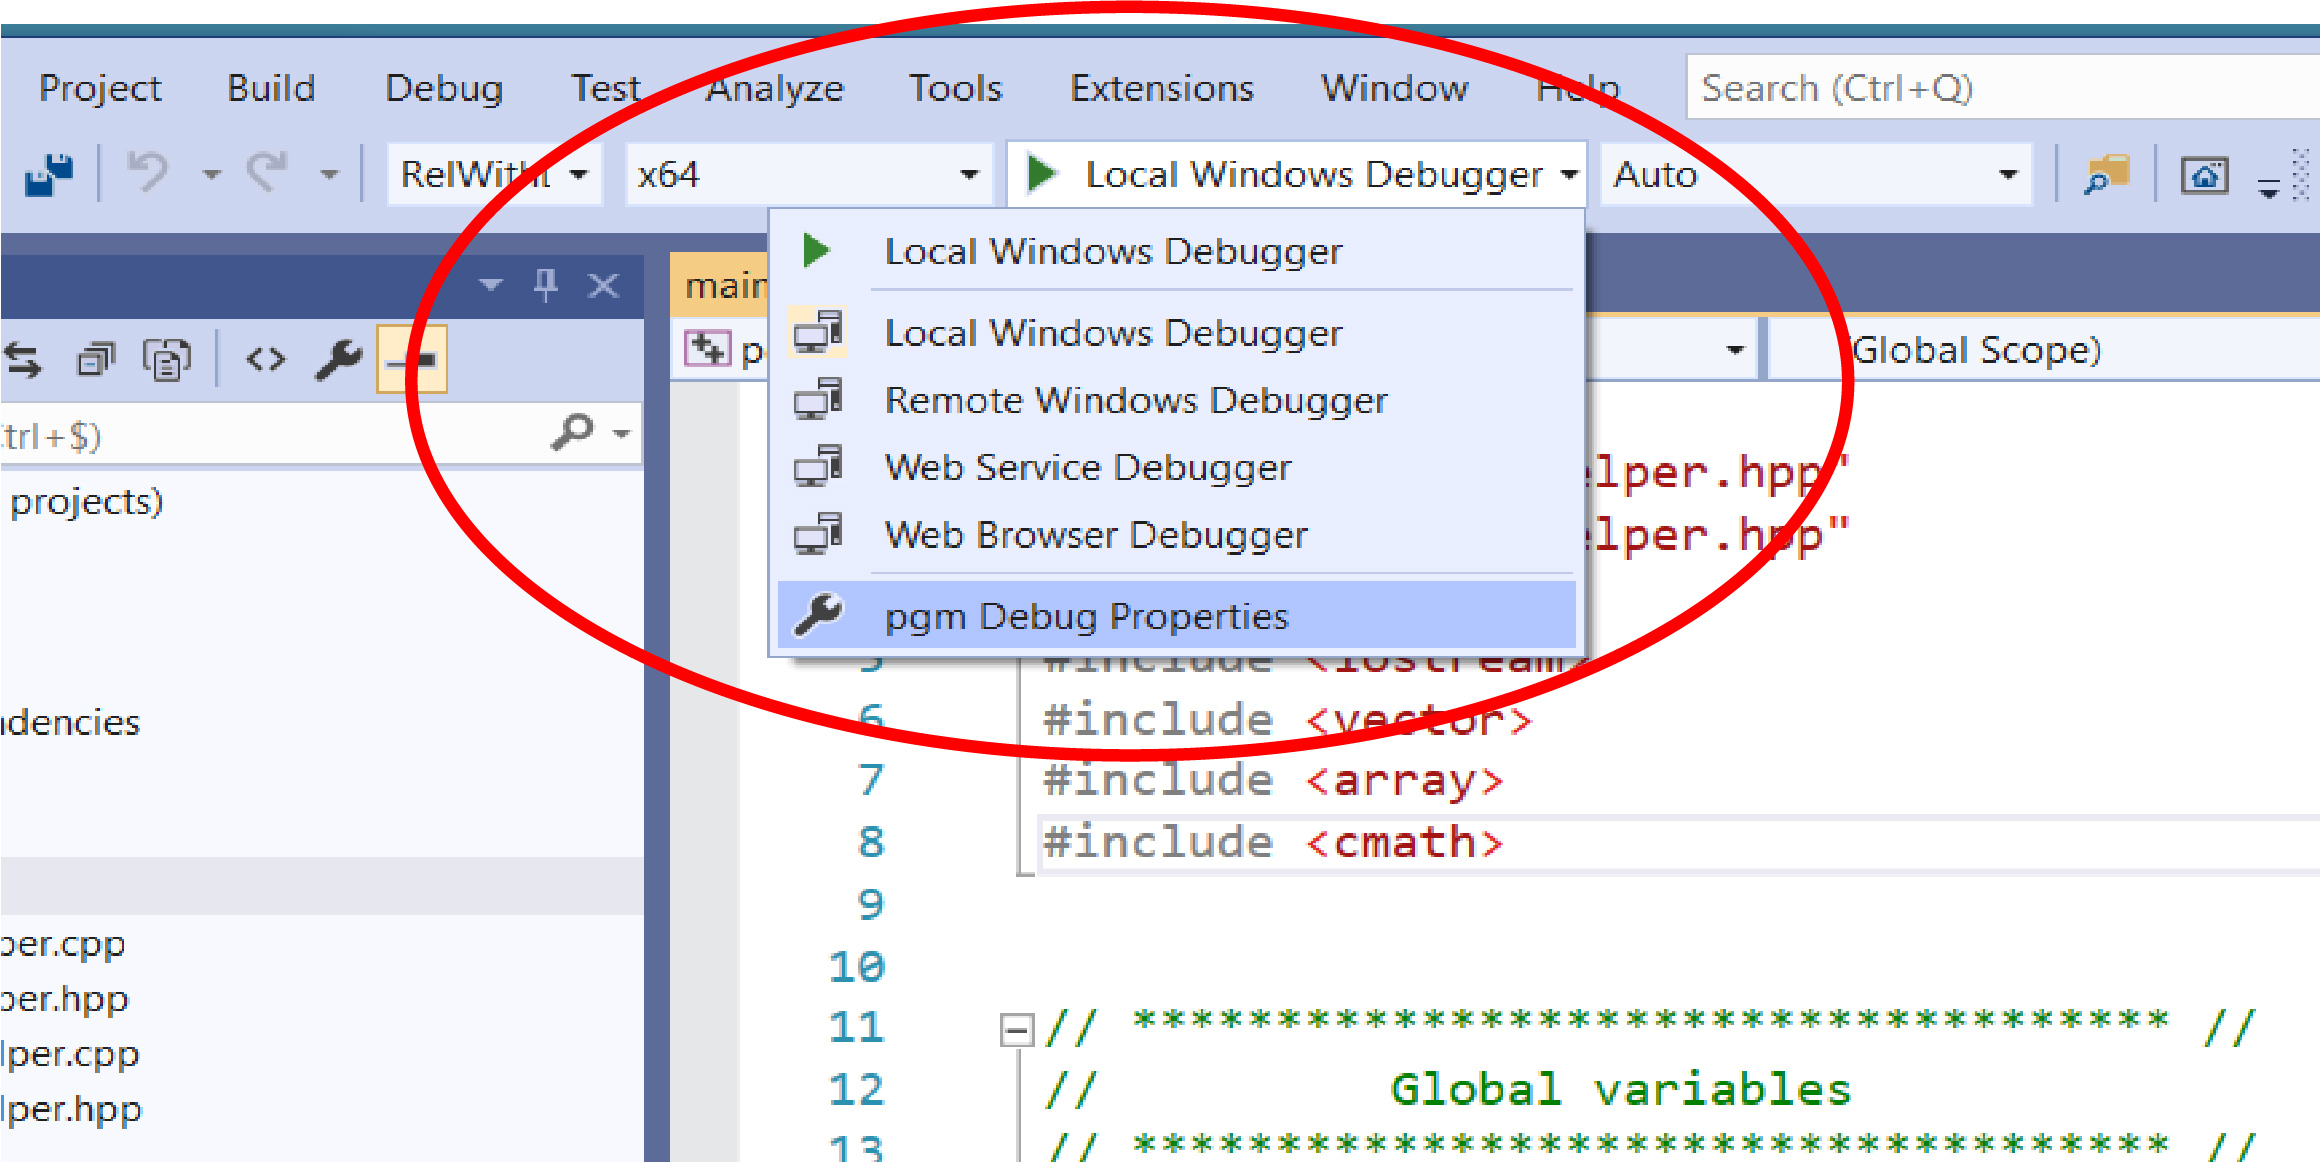
- > Change the build type from 'Debug' to 'RelWithDebInfo' (this allows to have optimal runtime performance, while preserving debug information).
- > In Local Windows Debugger, select 'projectName Debug Properties'.
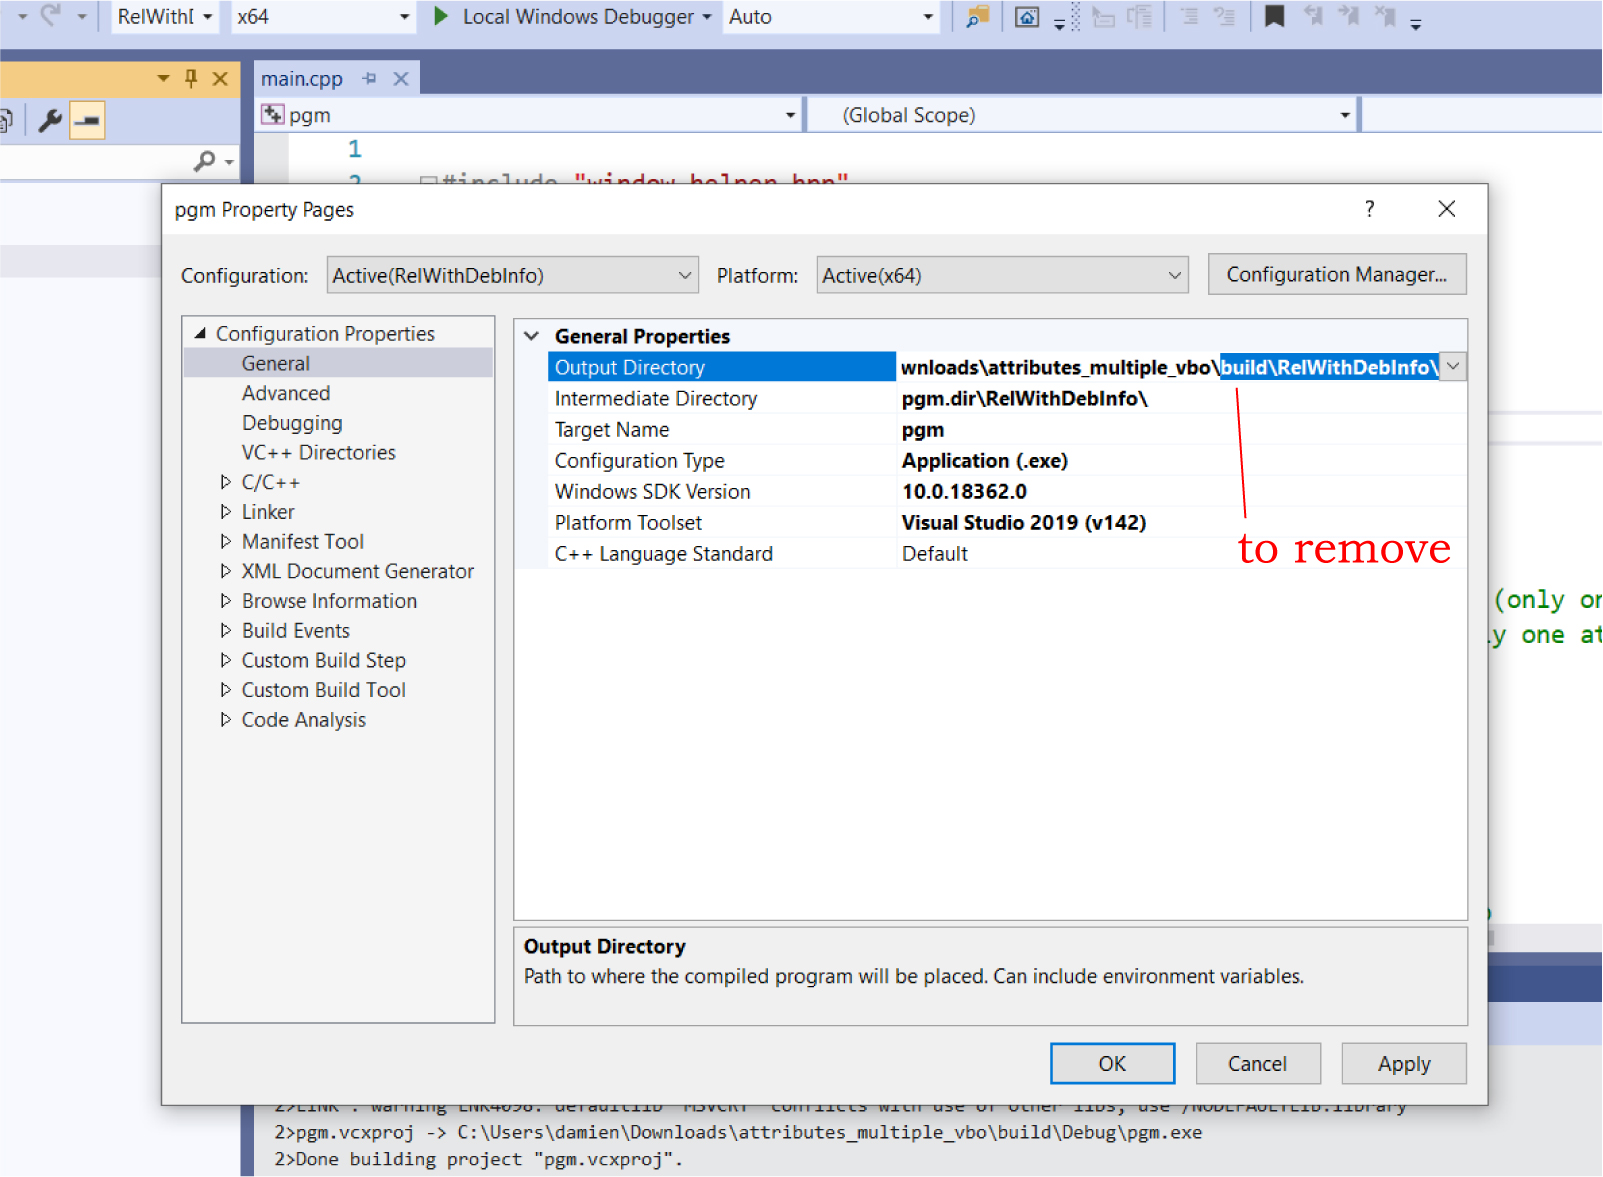
- > In the General properties (selected by default) change the value of Output Directory in removing the directory 'build\RelWithDebInfo\' from the path (the end of the pathname)
-
- (As a result, the executable `sample_code.exe` will be generated in the root directory of the project instead of a build\RelWithDebInfo\ subdirectory).
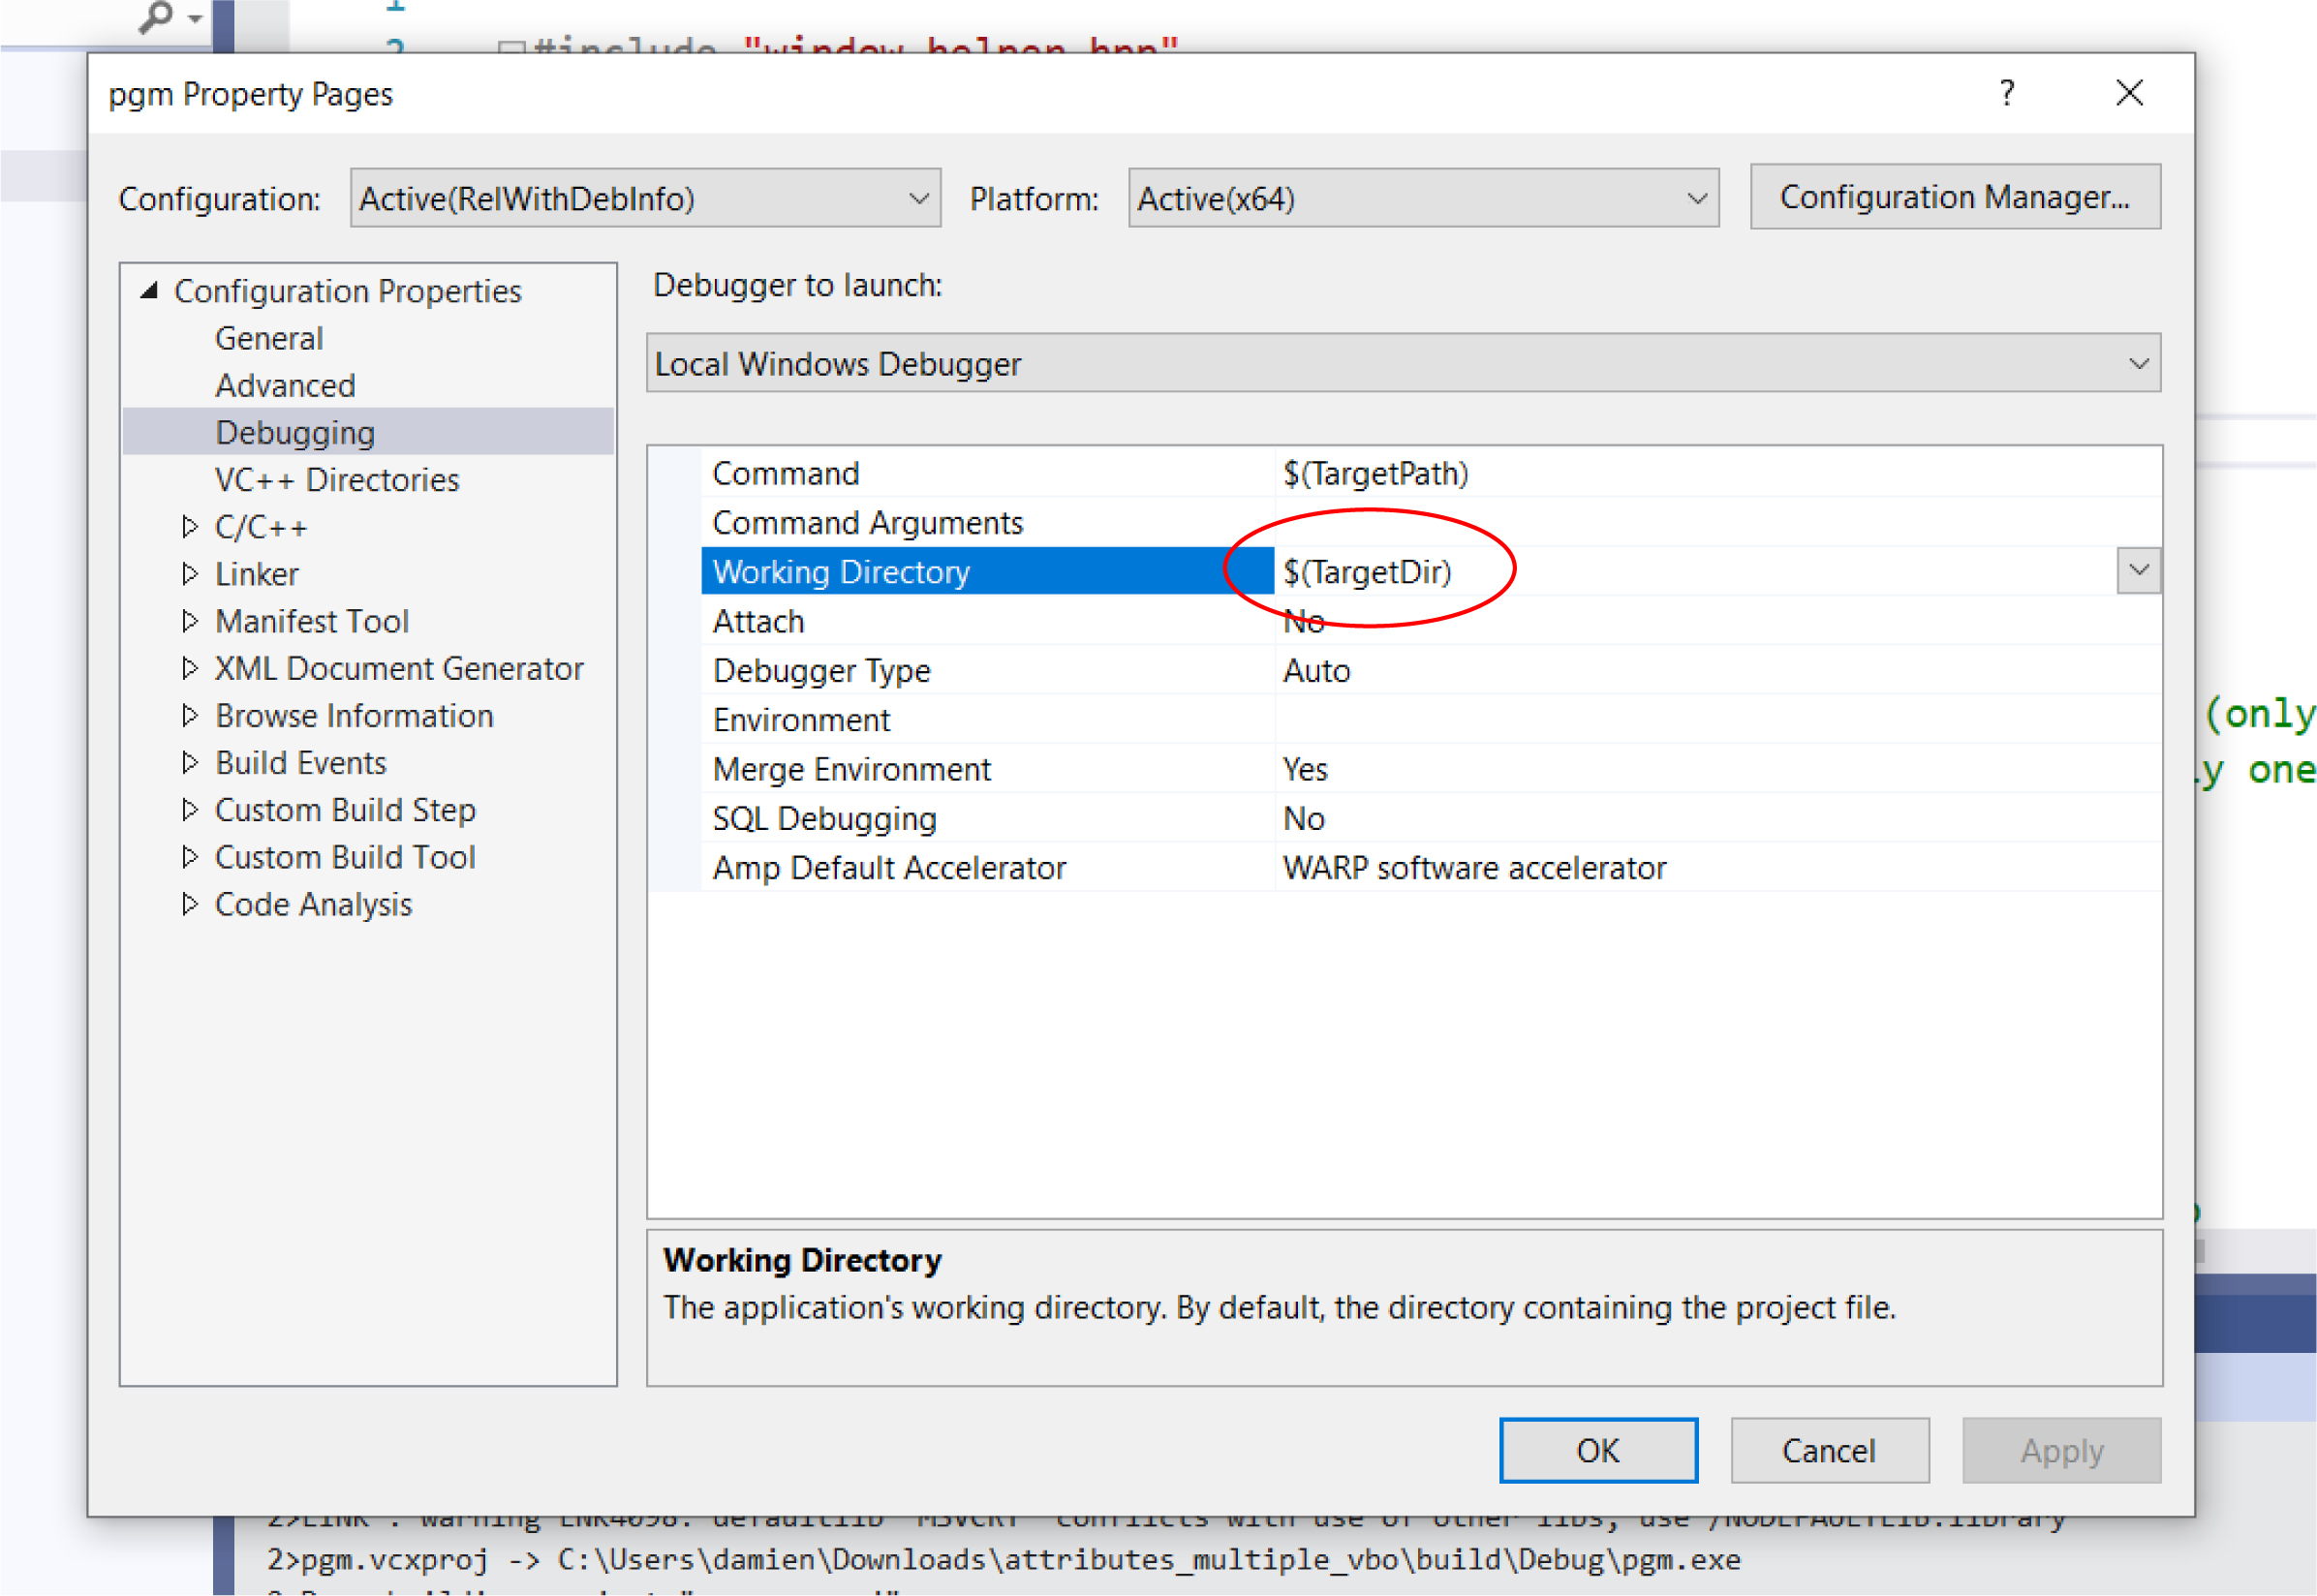
- > In the Debugging property change the value of Working Directory from $(ProjectDir) to $(TargetDir)
-
- (This will allow to run the Visual Studio debugger from the correct root directory where the executable is generated).
Compiling and runing the executable
- - The project can now be compiled using 'Build/Build Solution' (or F7).
- - Finally, the executable can be run
-
- - With a click on `Local Windows Debugger` (or F5) (With debug information from Visual Studio).
- - Using CTRL+F5 (or double click on the file sample_code.exe) (Without debug information from Visual Studio).